一、配置网络
1、至少准备两台服务器
将两台设备设置成静态ip,配置网关和DNS
我这里有两台机器
一台master 192.168.138.136
一台node 192.168.138.137
2、修改master主机名和node主机名
master主机:
hostnamectl set-hostname master

node主机:
hostnamectl set-hostname node01
3、编辑/etc/hosts文件,添加下面内容
192.168.138.136 master
192.168.138.137 node01
二、准备工作
1、时间同步
systemctl start chronyd
systemctl enable chronyd
date
2、禁用防火墙和iptables
systemctl stop firewalld
systemctl disable firewalld
systemctl stop iptables
systemctl disable iptables
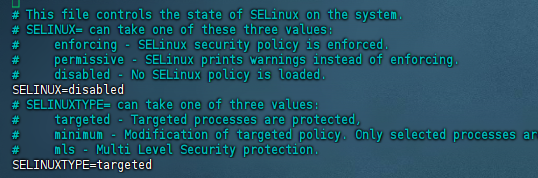
3、禁用selinux
编辑/etc/selinux/config文件,修改SELINUX的值为disabled
vim /etc/selinux/config修改后:
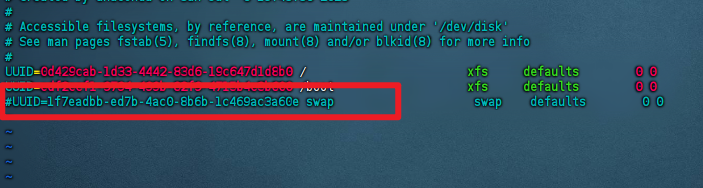
4、禁用swap分区
编辑分区配置文件/etc/fstab,注释调swap一行
vim /etc/fstab修改后:
5、修改linux内核参数,添加网桥过滤和地址转发功能
cat <<EOF> /etc/sysctl.d/kubernetes.conf
net.bridge.bridge-nf-call-iptables=1
net.bridge.bridge-nf-call-ip6tables=1
net.ipv4.ip_forward=1
EOF

重新加载配置:

sysctl -p

添加网桥过滤模块:

modprobe br_netfilter

查看是否加载成功:

lsmod | grep br_netfilter
6、配置yum
备份原始文件
mv /etc/yum.repos.d/CentOS-Base.repo /etc/yum.repos.d/CentOS-Base.backup下载yum的repo文件
curl -o /etc/yum.repos.d/CentOS-Base.repo http://mirrors.aliyun.com/repo/Centos-7.repo清除缓存重新加载
yum clean all && yum makecache7、配置ipvs,安装ipset和ipvsadm
yum install ipset ipvsadm -y写入脚本文件
cat <<EOF> /etc/sysconfig/modules/ipvs.modules
#!/bin/bash
modprobe -- ip_vs
modprobe -- ip_vs_rr
modprobe -- ip_vs_wrr
modprobe -- ip_vs_sh
modprobe -- nf_conntrack_ipv4
EOF
为脚本添加权限,并查看是否加载成功
chmod 755 /etc/sysconfig/modules/ipvs.modules && bash /etc/sysconfig/modules/ipvs.modules && lsmod | grep -e ip_vs -e nf_conntrack_ipv4
完成上面几个步骤之后重启服务器
三、安装Docker
1、切换镜像源
下载http://mirrors.aliyun.com/docker-ce/linux/centos/docker-ce.repo的repo文件放到/etc/yum.repos.d/目录下
2、下载docker
yum install --setop=obsoletes=0 docker-ce-18.06.3.ce-3.el7 -y3、添加配置文件
mkdir /etc/docker

cat > /etc/docker/daemon.json <<EOF
{
"exec-opts": ["native.cgroupdriver=systemd"]
}
EOF
4、启用docker
systemctl restart docker
systemctl enable docker
因为Docker被墙之后,得使用魔法才能拉取镜像
5、添加Docker服务代理配置文件
mkdir -p /etc/systemd/system/docker.service.d
vim /etc/systemd/system/docker.service.d/http-proxy.conf
6、配置文件添加以下内容
[Service]
Environment="HTTP_PROXY=http://192.168.138.1:7890"
Environment="HTTPS_PROXY=http://192.168.138.1:7890"
这里我使用的是clash,clash的默认端口是7890,ip要使用开启代理的ip
7、刷新docker配置
systemctl daemon-reload
systemctl restart docker
四、安装K8S
1、切换源
cat <<EOF > /etc/yum.repos.d/kubernetes.repo
[kubernetes]
name=Kubernetes
baseurl=http://mirrors.aliyun.com/kubernetes/yum/repos/kubernetes-el7-x86_64
enabled=1
gpgcheck=0
repo_gpgcheck=0
gpgkey=http://mirrors.aliyun.com/kubernetes/yum/doc/yum-key.gpg
http://mirrors.aliyun.com/kubernetes/yum/doc/rpm-package-key.gpg
EOF
2、安装k8s
yum install –setop=obsoletes=0 kubeadm-1.17.4-0 kubelet-1.17.4-0 kubectl-1.17.4-0 -y
3、配置kubelet的cgroup,编辑/etc/sysconfig/kubelet,添加下面的配置
vim /etc/sysconfig/kubelet
KUBELET_CGROUP_ARGS="--cgroup-driver=systemd"
KUBE_PROXY_MODE="ipvs"
4、设置开机启动
systemctl enable kubelet5、Master节点初始化:
kubeadm init --kubernetes-version=v1.17.4 --pod-network-cidr=10.244.0.0/16 --service-cidr=10.96.0.0/12 --apiserver-advertise-address=192.168.138.1366、Master创建必要文件:
mkdir -p $HOME/.kube
sudo cp -i /etc/kubernetes/admin.conf $HOME/.kube/config
sudo chown $(id -u):$(id -g) $HOME/.kube/config
7、Master节点创建成功后将Node节点加入集群

Node节点加入集群:
kubeadm join 192.168.138.136:6443 --token cwjf6f.8d9twy4osixxx5iz \
    --discovery-token-ca-cert-hash sha256:8efd3f14cca9d78185a3d85a11f980b080041a56a9cc2eca7e75d8f6f61c5e83
Master查看节点
kubectl get nodes8、Master安装网络插件
kubectl apply -f https://raw.githubusercontent.com/coreos/flannel/master/Documentation/kube-flannel.yml
或者手动创建kube-flannel.yml

vim kube-flannel.yml
---
kind: Namespace
apiVersion: v1
metadata:
name: kube-flannel
labels:
k8s-app: flannel
pod-security.kubernetes.io/enforce: privileged
---
kind: ClusterRole
apiVersion: rbac.authorization.k8s.io/v1
metadata:
labels:
k8s-app: flannel
name: flannel
rules:
- apiGroups:
- ""
resources:
- pods
verbs:
- get
- apiGroups:
- ""
resources:
- nodes
verbs:
- get
- list
- watch
- apiGroups:
- ""
resources:
- nodes/status
verbs:
- patch
---
kind: ClusterRoleBinding
apiVersion: rbac.authorization.k8s.io/v1
metadata:
labels:
k8s-app: flannel
name: flannel
roleRef:
apiGroup: rbac.authorization.k8s.io
kind: ClusterRole
name: flannel
subjects:
- kind: ServiceAccount
name: flannel
namespace: kube-flannel
---
apiVersion: v1
kind: ServiceAccount
metadata:
labels:
k8s-app: flannel
name: flannel
namespace: kube-flannel
---
kind: ConfigMap
apiVersion: v1
metadata:
name: kube-flannel-cfg
namespace: kube-flannel
labels:
tier: node
k8s-app: flannel
app: flannel
data:
cni-conf.json: |
{
"name": "cbr0",
"cniVersion": "0.3.1",
"plugins": [
{
"type": "flannel",
"delegate": {
"hairpinMode": true,
"isDefaultGateway": true
}
},
{
"type": "portmap",
"capabilities": {
"portMappings": true
}
}
]
}
net-conf.json: |
{
"Network": "10.244.0.0/16",
"EnableNFTables": false,
"Backend": {
"Type": "vxlan"
}
}
---
apiVersion: apps/v1
kind: DaemonSet
metadata:
name: kube-flannel-ds
namespace: kube-flannel
labels:
tier: node
app: flannel
k8s-app: flannel
spec:
selector:
matchLabels:
app: flannel
template:
metadata:
labels:
tier: node
app: flannel
spec:
affinity:
nodeAffinity:
requiredDuringSchedulingIgnoredDuringExecution:
nodeSelectorTerms:
- matchExpressions:
- key: kubernetes.io/os
operator: In
values:
- linux
hostNetwork: true
priorityClassName: system-node-critical
tolerations:
- operator: Exists
effect: NoSchedule
serviceAccountName: flannel
initContainers:
- name: install-cni-plugin
image: ghcr.io/flannel-io/flannel-cni-plugin:v1.7.1-flannel1
command:
- cp
args:
- -f
- /flannel
- /opt/cni/bin/flannel
volumeMounts:
- name: cni-plugin
mountPath: /opt/cni/bin
- name: install-cni
image: ghcr.io/flannel-io/flannel:v0.27.0
command:
- cp
args:
- -f
- /etc/kube-flannel/cni-conf.json
- /etc/cni/net.d/10-flannel.conflist
volumeMounts:
- name: cni
mountPath: /etc/cni/net.d
- name: flannel-cfg
mountPath: /etc/kube-flannel/
containers:
- name: kube-flannel
image: ghcr.io/flannel-io/flannel:v0.27.0
command:
- /opt/bin/flanneld
args:
- --ip-masq
- --kube-subnet-mgr
resources:
requests:
cpu: "100m"
memory: "50Mi"
securityContext:
privileged: false
capabilities:
add: ["NET_ADMIN", "NET_RAW"]
env:
- name: POD_NAME
valueFrom:
fieldRef:
fieldPath: metadata.name
- name: POD_NAMESPACE
valueFrom:
fieldRef:
fieldPath: metadata.namespace
- name: EVENT_QUEUE_DEPTH
value: "5000"
- name: CONT_WHEN_CACHE_NOT_READY
value: "false"
volumeMounts:
- name: run
mountPath: /run/flannel
- name: flannel-cfg
mountPath: /etc/kube-flannel/
- name: xtables-lock
mountPath: /run/xtables.lock
volumes:
- name: run
hostPath:
path: /run/flannel
- name: cni-plugin
hostPath:
path: /opt/cni/bin
- name: cni
hostPath:
path: /etc/cni/net.d
- name: flannel-cfg
configMap:
name: kube-flannel-cfg
- name: xtables-lock
hostPath:
path: /run/xtables.lock
type: FileOrCreate五、安装Kuboard
kubectl apply -f https://addons.kuboard.cn/kuboard/kuboard-v3.yaml安装成功后访问http://ip地址:30080,默认账户:admin,密码:Kuboard123
六、关于重置K8s
1、Master端
1.kubectl 查看命令是否正常
2.cd ~ 进入根目录
3.ll -a 查看是否存在.kube文件
4.rm -rf .kube/ 删除
5.systemctl restart docker 重启docker
6.systemctl restart kubelet 重启kubelet
7.kubeadm reset 重置
8.rm -rf /etc/cni/ 删除
9.重新init
2、Node端
1.kubeadm reset 重置
2.rm -rf /etc/cni/
发表回复